


When it comes to personalizing your vehicle, one of the simplest yet most impactful modifications is the installation of a new exhaust tip. This upgrade not only enhances the aesthetic appeal of your car but can also improve its sound and performance. Understanding the steps involved in the installation process is crucial for achieving the desired results and ensuring a secure fit.
The exhaust system plays a vital role in the overall efficiency of your vehicle. A well-chosen exhaust tip can influence the exhaust flow and contribute to better engine performance. However, proper installation is essential to avoid issues such as leaks or excessive noise. In this guide, we will explore the necessary tools and steps required for the installation of a new exhaust tip, ensuring that you have a rewarding experience.
Before diving into the installation, it is important to select an exhaust tip that complements your vehicle’s design and meets your performance expectations. From the material and finish to the size and shape, each factor plays a significant role in the final outcome. Once you have made your choice, you can follow the detailed instructions provided in this guide to ensure a smooth and successful installation.
Choosing the Right Exhaust Tip for Your Car Model

Selecting the appropriate exhaust tip is crucial for enhancing both the aesthetics and performance of your vehicle. Different car models have unique specifications, which means not every exhaust tip will fit perfectly or perform optimally. Begin by consulting your car’s manual for any manufacturer recommendations regarding exhaust components.
Consider the size of the exhaust tip. The diameter should match or slightly exceed the size of your existing exhaust pipe for seamless installation. A tip that is too large can cause back pressure issues, while one that is too small may impede exhaust flow.
The shape of the exhaust tip also plays a critical role in your vehicle’s overall appearance. Options range from round to oval or square designs. Each shape offers a different visual impact, so choose one that complements your car’s style.
Material is another important factor. Stainless steel tips are durable and resistant to rust, while chrome tips can provide a shiny finish but may require more maintenance to prevent tarnishing. Consider your local climate and driving conditions when making this choice.
Additionally, think about the finish. A polished finish will give a sleek look, while a matte finish can add a more aggressive touch. Some tips come with unique coatings that offer both aesthetic and longevity benefits.
Finally, reflect on how the new exhaust tip will alter your vehicle’s sound. Different designs can enhance or mute the exhaust note significantly. If you prefer a deeper rumble, opt for a larger, more open tip, while a smaller, more restrictive tip could produce a quieter result.
By carefully considering these elements, you can choose an exhaust tip that not only fits your car model perfectly but also enhances its performance and style.
Tools and Materials Needed for Exhaust Tip Installation
For a successful exhaust tip installation, having the right tools and materials is crucial. Below is a list of items you will need.
Tools:
- Socket Wrench Set: This is essential for loosening and tightening nuts or bolts holding the exhaust components.
- Torque Wrench: Ensures that bolts are tightened to the manufacturer’s specified torque settings to prevent leaks.
- Cutoff Saw or Pipe Cutter: Useful if you need to trim the existing exhaust pipe to properly fit the new tip.
- Screwdriver Set: Both flathead and Phillips screwdrivers may be needed depending on the type of clamps used.
- Rubber Mallet: A gentle way to tap and adjust the exhaust tip without causing damage.
- Jack and Jack Stands: If you need to raise your vehicle for easier access beneath the exhaust system.
Materials:
- Exhaust Tip: Choose a high-quality exhaust tip compatible with your vehicle’s exhaust system.
- Clamps: Required to securely attach the exhaust tip to the pipe, ensuring no leaks occur.
- Sealant or Gasket: Optional, but can provide extra sealing if your exhaust tip comes with a flange.
- Safety Gloves: Protects your hands while working with sharp metal edges.
- Safety Glasses: To shield your eyes from debris during cutting or grinding.
Having these tools and materials ready will facilitate a smooth installation process for your new exhaust tip, ensuring optimal performance and style enhancement for your vehicle.
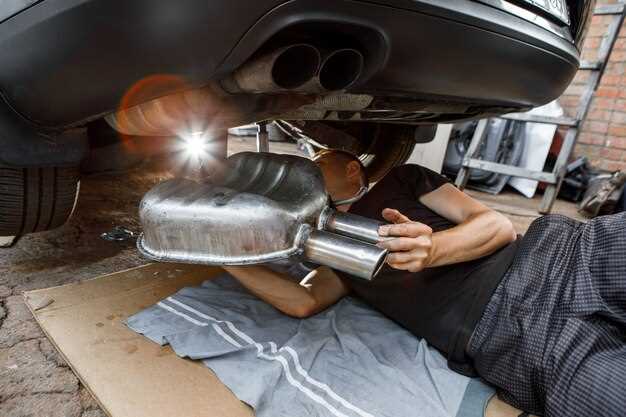
Step-by-Step Instructions for Installing Your Exhaust Tip
Start by gathering all necessary tools and materials for the installation. You will need a socket wrench set, a screwdriver, a saw (if trimming is necessary), and your new exhaust tip.
Next, ensure your vehicle is parked on a flat surface and that the engine is cool. This will provide a safe environment for the installation process.
Using the socket wrench, loosen and remove the existing exhaust tip if applicable. This may involve unscrewing clamps or bolts securing the tip in place. Be cautious not to damage surrounding components.
Once the old tip is removed, clean the exhaust pipe thoroughly. Remove any rust, debris, or residue to ensure a proper fit for the new tip.
Now, position the new exhaust tip onto the end of the exhaust pipe. Make sure it fits snugly and is aligned properly. If the tip requires trimming for a better fit, measure and cut accordingly.
After aligning, secure the exhaust tip by tightening the clamps or bolts. Be sure not to overtighten, as this could damage the tip or exhaust pipe.
Lastly, double-check all connections and ensure everything is secure before starting your vehicle. Listen for any unusual sounds when the engine is running, as this may indicate an improper installation.
With these steps completed, your new exhaust tip should be successfully installed and ready for use.


