


Maintaining a healthy cooling system is essential for the longevity and performance of your vehicle. One critical aspect of this upkeep is the regular flush of your car’s radiator. Over time, coolant can become contaminated with rust, sediment, and other debris, leading to overheating and potential damage to your engine. This guide provides you with the essential steps and safety measures to ensure a successful flush.
A proper radiator flush not only removes harmful buildup but also replenishes the cooling system with fresh coolant, enhancing thermal efficiency. Flushing your radiator can seem daunting, but with the right approach and tools, it can be executed safely and effectively. In the following sections, we will cover the necessary preparations, tools, and step-by-step instructions needed to conduct a radiator flush that will keep your engine running smoothly.
Whether you’re a seasoned mechanic or a novice car enthusiast, understanding the importance of flushing your radiator and knowing how to do it safely will empower you to tackle this vital maintenance task confidently. Let’s dive into the details and ensure that you have all the information you need for a successful flush.
Choosing the Right Flush Solution for Your Vehicle
Selecting the appropriate flush solution for your vehicle is crucial for maintaining optimal performance and longevity of your cooling system. Flush solutions come in various formulations, each designed to tackle specific issues like rust, scale buildup, and old coolant residues. When considering a DIY radiator flush, it’s important to identify the current condition of your coolant and radiator system.
Firstly, assess whether your vehicle has significant rust or corrosion. For systems with heavy buildup, a more aggressive chemical flush may be required. Look for products labeled as “heavy-duty” or “professional-grade” for effective removal of stubborn deposits. If your cooling system appears relatively clean, a standard flush solution will suffice. These are typically formulated to remove light contaminants while being safe for various engine types.
Another factor to consider is whether your vehicle has previously used conventional or organic acid technology (OAT) coolants. Some flush solutions are incompatible with certain types of coolant, leading to potential damage. Always check the product label to ensure compatibility with your existing coolant type.
For a DIY radiator flush, it’s advisable to choose a solution that includes rust inhibitors. This ensures that while you are cleaning the system, you’re also protecting it from future corrosion. Additionally, make sure to follow the manufacturer’s instructions for the appropriate dilution ratios and flushing procedures.
Always prioritize safety when handling flush solutions. Use gloves and eyewear, and ensure proper disposal of old coolant in accordance with local regulations. A careful approach will safeguard both your vehicle and the environment.
Step-by-Step Procedure for Flushing Your Radiator
Flushing your car radiator is an essential DIY task that can help maintain your vehicle’s cooling system. Follow these steps to ensure a thorough and safe flush.
Step 1: Gather Materials
Before starting the process, collect necessary materials: radiator flush solution, a bucket, funnel, gloves, and safety goggles. Make sure to have a source of water nearby for rinsing.
Step 2: Prepare the Vehicle
Park your vehicle on a level surface and ensure the engine is completely cool. Turn off the ignition and engage the parking brake for safety.
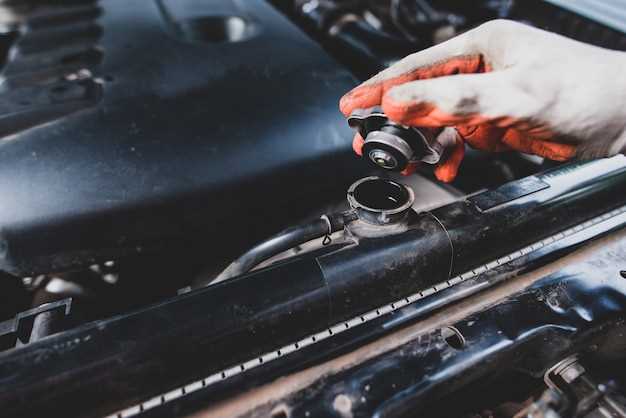
Step 3: Drain the Radiator
Locate the radiator drain valve, usually at the bottom of the radiator. Place a bucket under the valve and open it to let the old coolant drain out. Make sure to dispose of the coolant properly, as it is toxic.
Step 4: Add Radiator Flush Solution
Once drained, close the valve and use a funnel to add the radiator flush solution into the radiator. Refer to the product instructions for the correct amount to use.
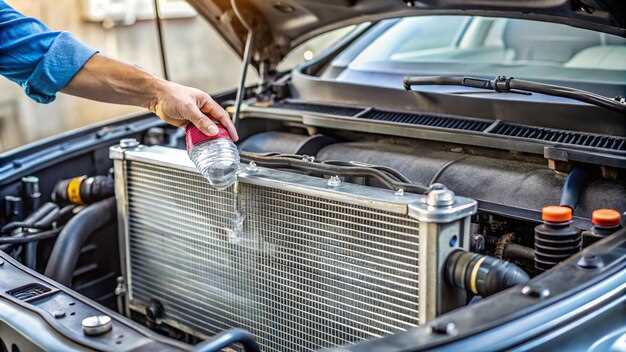
Step 5: Fill with Water
After adding the flush solution, fill the rest of the radiator with water until it reaches the neck. Start the engine and let it run for about 10-15 minutes. This allows the solution to circulate through the system.
Step 6: Drain the Flush Solution
After running the engine, turn it off and allow it to cool. Drain the radiator again in the same manner as before, capturing the mixture in the bucket.
Step 7: Rinse the Radiator
With the drain valve open, flush the radiator several times with clean water. This helps remove any remaining flush solution and debris. Continue until the drained water runs clear.
Step 8: Refill the Radiator
Once rinsed, close the drain valve and refill the radiator with a mixture of the appropriate coolant and water, ensuring correct ratios as per your vehicle’s requirements.
Step 9: Check for Leaks
Start the engine again and let it run while checking for any leaks around the radiator. Inspect hoses and connections to ensure everything is secure.
Step 10: Dispose of Waste Properly
Ensure you properly dispose of the old coolant and flush solutions, as they are hazardous. Check local regulations for correct disposal methods.
Following these steps will ensure your radiator is flushed effectively, helping maintain your vehicle’s cooling system and preventing future issues.
Disposing of Coolant and Cleaning Up After the Flush
After completing a DIY radiator flush, proper disposal of coolant and thorough cleanup are essential to safeguard the environment and ensure safety. Follow these guidelines:
- Check Local Regulations: Before disposing of coolant, verify local laws regarding hazardous waste. Many areas have specific guidelines for disposing of automotive fluids.
- Use Proper Containers: Store the used coolant in a leak-proof container. Make sure the container is clearly labeled as “used coolant” to prevent accidental misuse.
- Take to Recycling Facilities: Locate a recycling or hazardous waste disposal facility in your area that accepts used coolant. Many auto parts stores also offer recycling services.
While handling used coolant, always wear gloves and protective eyewear to avoid skin contact and irritation. Never pour coolant down the drain or on the ground, as it can contaminate water sources and harm wildlife.
Once the coolant has been disposed of, it’s time to clean up your workspace:
- Wipe Down Surfaces: Use rags or paper towels to clean any spills or drips from the engine bay or your work area. Dispose of these materials in the same manner as the coolant.
- Wash Tools: Clean your tools used during the flush with soap and water, ensuring they are free from coolant residues.
- Inspect the Area: Conduct a final check of the work area to ensure it is tidy and free of any hazardous materials.
These steps provide a responsible approach to managing used coolant and maintaining a safe environment after a radiator flush. Remember, taking these precautions reflects good DIY practices and demonstrates consideration for both personal safety and the community.


