


The cabin air filter plays a crucial role in maintaining the quality of the air you breathe inside your vehicle. Over time, this important component can become clogged with dust, pollen, and other contaminants, leading to reduced air quality and even potential health issues. Regularly changing your cabin air filter is essential for ensuring that the air circulating within your car is clean and fresh.
In this guide, we will walk you through the step-by-step process of replacing your cabin air filter. Whether you are a seasoned mechanic or a complete novice, this straightforward approach will empower you to take control of your vehicle’s air quality with ease. By following these detailed instructions, you can ensure that your car’s cabin remains a comfortable and healthy space for you and your passengers.
Making the effort to change your cabin air filter regularly not only benefits your health but can also improve the efficiency of your vehicle’s heating and air conditioning systems. With a clean filter, your car’s air circulation will be optimized, resulting in a more enjoyable driving experience. Let’s get started on this simple yet rewarding maintenance task.
Identifying the Right Cabin Air Filter for Your Vehicle

Choosing the correct cabin air filter for your vehicle is crucial for maintaining a healthy and comfortable driving environment. Follow these steps to ensure you select the right filter.
- Check the Owner’s Manual:
Your vehicle’s owner manual is the best source of information for identifying the correct cabin air filter. Look for specifications regarding the size and type of filter recommended for your model.
- Know Your Vehicle’s Make and Model:
Gather details about your vehicle’s make, model, and year, as these factors play a key role in determining the appropriate filter. Different manufacturers often have specific requirements for air filters.
- Visit Auto Parts Retailers:
Many auto parts stores have online databases where you can enter your vehicle details to find compatible cabin air filters. This can also be done in-store with the help of a sales associate.
- Consider Filter Types:
Cabin air filters come in various types, such as HEPA, activated carbon, or standard particulate filters. Decide which type best suits your needs based on factors like allergies or air quality preferences.
- Look for Quality Certifications:
Choose filters that meet or exceed OEM (Original Equipment Manufacturer) standards. Look for certifications such as ISO or those validating the filter’s efficiency in trapping contaminants.
- Review Customer Feedback:
Read reviews and ratings from other vehicle owners to choose filters that have consistently performed well in real-world conditions. This can save you time and ensure you get a reliable product.
By following these steps, you can confidently identify the right cabin air filter for your vehicle, ensuring better air quality and a more pleasant driving experience.
Step-by-Step Guide to Accessing the Cabin Air Filter Compartment
Accessing the cabin air filter compartment involves several straightforward steps. First, ensure your vehicle is parked safely and the engine is turned off.
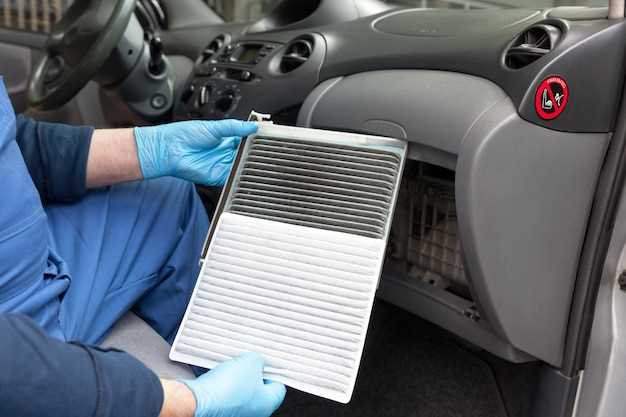
The cabin air filter is typically located behind the glove compartment or under the dashboard. Begin by opening the glove compartment and removing any items inside to clear the area.
Next, you may need to detach the stop arm of the glove compartment. This usually involves pressing in on the sides of the glove compartment to allow it to drop further down. In some vehicles, you might find a few screws or clips that need to be removed to access the compartment.
If the filter is behind the glove compartment, locate the back panel or cover that conceals the filter. This panel may be held in place by screws or clips. Carefully remove these fasteners to access the cabin air filter.
Once the cover is removed, you will see the air filter. Take note of the orientation of the filter for correct installation later. Gently pull out the old filter, making sure to avoid any debris falling into the air intake.
Now that you’ve accessed the old filter, you can proceed to change it. Insert the new filter, ensuring it is positioned correctly to maintain optimal airflow. Replace the cover and reattach the glove compartment, ensuring everything is secured properly.
Finally, close the glove compartment and check the air system to ensure it is functioning smoothly with the new filter in place. Regularly replacing your cabin air filter will help improve the air quality inside your vehicle.
Proper Installation and Maintenance Tips for Longevity
To ensure the longevity of your cabin air filter, proper installation is crucial. Begin by carefully aligning the filter according to any directional arrows indicated on its frame. Incorrect orientation can hinder airflow and reduce its effectiveness.
After replacement, run your vehicle’s air system on high for a few minutes. This step helps to settle the new filter and confirms that it’s installed correctly. Always double-check that there are no gaps between the filter and the housing, as these can allow unfiltered air to enter the cabin.
Regular maintenance is essential for optimal performance. It is recommended to change your cabin air filter every 12,000 to 15,000 miles, or as needed based on your driving environment. In areas with high levels of dust or pollen, consider changing the filter more frequently.
Keep an eye on the filter’s condition during routine vehicle maintenance. If you notice any unusual odors or reduced air flow, it may indicate that the filter needs changing sooner than planned. Additionally, use high-quality filters that meet your vehicle manufacturer’s specifications to ensure the best air quality and performance.
Lastly, be mindful of any warning signs from your vehicle. A clean and properly installed cabin air filter not only enhances air quality but also contributes to the efficiency and longevity of your vehicle’s HVAC system.


