


When it comes to vehicle maintenance, a cracked bumper can be a frustrating issue to deal with. Not only does it affect the vehicle’s appearance, but it can also compromise its structural integrity and safety. This guide will walk you through the process of how to fix a cracked bumper effectively, ensuring that your car looks as good as new.
The first step in repairing a cracked bumper is to assess the damage. Identifying the severity of the crack will help you determine whether you can fix it yourself or need to seek professional help. Small cracks can often be repaired with just a few materials, while larger cracks may require more extensive work.
Once you’ve decided to tackle the repair yourself, gathering the necessary tools and materials is crucial. This may include epoxy adhesive, sandpaper, paint, and a heat gun, among others. Following the proper steps in repairing the crack will not only restore the bumper’s functionality but also improve the overall look of your vehicle. Let’s dive into the process of fixing a cracked bumper step by step.
Assessing the Damage and Preparing the Area
Before you begin the repair process, it is essential to accurately assess the damage to the cracked bumper. Start by inspecting the crack closely to determine its length, depth, and location. This evaluation will guide you in selecting the appropriate materials and techniques for the fix.
Once you have assessed the damage, clean the area surrounding the crack to ensure a successful repair. Use soap and water to remove any dirt or debris. Dry the surface thoroughly to avoid complications during the fixing process.
If the crack is large or has resulted in additional damage, consider reinforcing the area with adhesive or a backing material. This step can provide added support during the repair, ensuring durability after the fix is completed.
Gather all necessary tools and materials before starting the repair. This preparation includes adhesive for bonding, sandpaper for smoothing edges, and paint for finishing touches. Having everything ready will streamline the repair process and help achieve a professional-looking result.
Selecting the Right Materials for Bumper Repair

When it comes to repairing a cracked bumper, choosing the appropriate materials is crucial for achieving a durable and effective fix. Several options are available, each with its own strengths and weaknesses. Understanding these materials will help ensure a successful repair.
First, consider plastic repair kits specifically designed for automotive bumpers. These kits often include adhesive compounds and fillers that are formulated to bond well with the plastic commonly used in bumpers. Look for products that mention compatibility with polypropylene and polyethylene, as these are the most common types of bumper materials.
Second, epoxy resins are another excellent choice for bumper repair. They provide strong adhesion and can fill cracks effectively. When selecting an epoxy, ensure it is rated for automotive use, as this will guarantee resistance to moisture and temperature fluctuations, which are common in vehicle applications.
Additionally, you may need fiberglass cloth or mats if the damage is extensive. This material adds strength to the repair and can stabilize large cracks. When using fiberglass, it is essential to pair it with a compatible resin to ensure a secure bond and long-lasting results.
Lastly, do not overlook sandpaper and paint. After making the repair, the area will need to be sanded to achieve a smooth finish. Additionally, quality automotive paint will be necessary to restore the bumper’s appearance and provide a protective layer against the elements.
In summary, when selecting materials for bumper repair, opt for specialized plastic repair kits, durable epoxy resins, fiberglass support for larger cracks, and finishing touches like sandpaper and automotive paint. Taking the time to choose the right components will result in a smoother repair process and a more durable outcome.
Applying the Repair Techniques and Finishing Touches
Once you have prepared your cracked bumper for repair, it’s time to apply the necessary techniques to ensure a successful fix. Follow these steps carefully to achieve a professional finish.
-
Clean the Area: Start by cleaning the area around the crack with soap and water. Ensure there is no dirt or grease that could interfere with the adhesive.
-
Sand the Crack: Use sandpaper to gently sand both the crack and the surrounding surface. This will create a rough texture, allowing the repair material to adhere better.
-
Choose Repair Material: Select an appropriate repair product based on the bumper material. For plastic bumpers, use a plastic welding kit or epoxy adhesive.
-
Apply Adhesive: Following the manufacturer’s instructions, apply the adhesive or epoxy to the crack. Ensure the product fills the crack completely but does not overflow.
-
Clamp the Bumper: If necessary, use clamps to hold the cracked sections together while the adhesive cures. This will help maintain the alignment of the bumper.
-
Let it Cure: Allow the adhesive to cure for the recommended time. Avoid moving or applying pressure to the bumper during this phase.
-
Sand Again: Once the adhesive has cured, sand the repair area smoothly to blend it with the rest of the bumper. Start with a coarse grit and finish with a finer grit for a smooth surface.
-
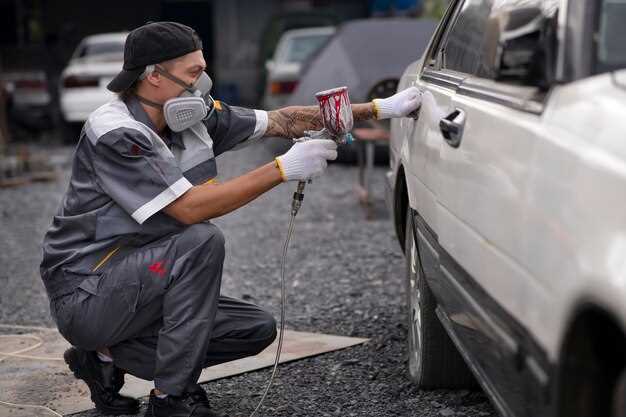
Paint the Repaired Area: Match the bumper paint color and apply several thin coats to the repaired area, allowing each coat to dry before applying the next.
-
Finish with Clear Coat: Once the paint is dry, apply a clear coat to protect the repair and enhance the finish. This will provide an additional layer of durability.
-
Final Inspection: Inspect the repair to ensure it is smooth, well-adhered, and matches the surrounding bumper color. Make any necessary touch-ups.
By following these steps, you can effectively repair a cracked bumper and restore its appearance. Proper techniques and attention to detail will ensure a lasting fix.


